
I'm sorry I haven't posted in a couple of days. My husband came down with pneumonia and so I was busy keeping him comfortable. I meant to post yesterday buy since I haven't used the Car Decals cartridge much, I wanted to take it for a spin before I sat down to write.
So today we are looking at the Cricut Cartridge Car Decals PLUS I would like to spend a little time talking about Cricut tips, tricks and lessons learned.
Yesterday, I was tinkering with Car Decals so I could offer some hands on feedback about the cuts and features. In the process, I ran into a couple of hiccups which can happen when you are working with a new image. It occurred to me that I should really write down the problems I run into and keep track of the lessons I learn along the way both, so I don't make then again, and so I can share them with you.
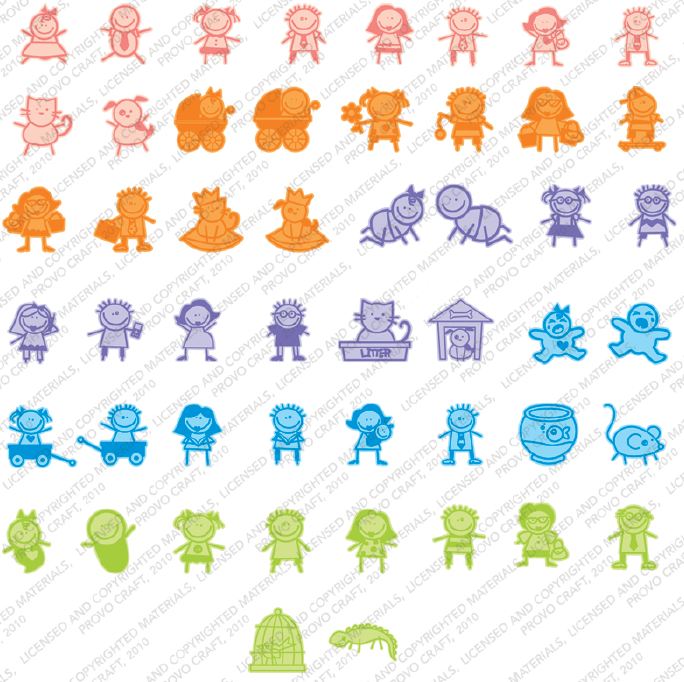
Above is the sample sheet that is on the back of the cartridge box. Aren't these images super cute? I love the whimsy and playfulness of these little characters. Along with these cuties you also get a font, phrases and many additional images.


The cartridge includes 0 - 9, A - Z and the all of the punctuation elements that come with a font. There are capitol letters only, no lower case.
Let's spend a minute talking about the primary or main images on the Car Decals cartridge. Below is a page out of the handbook. To the left, in color, is the primary image for the key on the key pad. Below the image is a mini key pad image that shows you the location of the key on the overlay. I *LOVE* this feature and wish it was in all of the handbooks. With the main image it isn't too difficult to locate the button on the keypad overlay, but when you apply shift, or go into a layer or other feature keys, it can be hard to "see" which key to push for additional layers, phrases or fonts that are also a product of that key. It makes it so much easier to have a quick reference on the handbook page.
To get the primary image you cut the baby girl outline (at the bottom on the left), then press shift
and cut the shadow that goes underneath (next to the outline on the right). The primary image is an
outline so once cricut cuts it, you will be left with both the outline and the internal
pieces. USE YOUR SPATULA WHEN YOU REMOVE THIS LAYER. Save the eyes and smile so you can adhere them in the face Unless
you are cutting the image pretty large, the eyes may not be perfect circles as shown in the sample, so I use a 1/16 inch hole punch to get the tiny dots.
The outline portion of the primary image is more difficult to cut when the image size gets smaller, but it is not impossible. I had
to tinker with my pressure, blade and speed setting so that the fine
details like the little curl below the bow, didn't tear. After a couple
tries with regular scrapbook paper I switched to cardstock to see if I
could get a cleaner result and it was much smoother. I'm sure if I had played with the settings a little more, I could have gotten the cut with the scrapbook paper but I liked the cardstock color better. I set the blade at 5, the speed at 4 and the pressure at 5.

Below is the same page but with more details about each of the key features.

This is another page in the handbook with similar information.

Next we a list of all of the images and phrases on this cartridge with their page numbers. If you find any errors in the spreadsheet, please let me know so I can correct them. If you would like to share this information on your blog, instead of copy and pasting this info, please paste a link to my site. The spreadsheet below is saved as a JPEG but you can download a PDF version of Car Decals here:

A few issues and observations with this cartridge:
- When working with any image, with this cartridge or another, I keep a little notebook and pen next to my cricut. When I cut an image I try to jot down the size of the cut so that if I go onto something else and then later, realize I want to add a shadow, I know what size the original cut was. You can spend a lot of time trying to figure out what you did when you want to recreate something and unless you are using Design Studio, Gypsy or Cricut Craft Room, the machine memories of project are gone when you move on to another cut.
- Use post it notes to jot down information you learn after you make a cut and attach the sticky notes to the handbook page. I made sure I noted that the curl on the baby girl image tore with scrapbook paper and than wrote down the blade, speed and pressure setting that worked for me with cardstock.
- Check your blade to make sure the arrow is in the front and centered. Sometimes the little guy gets twisted to one side or another and your cuts will be rough around the edges.
- Use a wet glue like Tombow MONO Multi Liquid Glue to adhere the top layer to the one underneath. The edges of that top layer, the outline image, are very fragile so a tape runner can be trouble. I actually put the wet glue on a piece of plastic and then dipped my paper piercer into it and dabbed it around the edges.
- Be patient. These images are not as easy as they seem. Finding good color combinations besides monochromatic took me some time and I found that I had to increase the size on a few of the shadows to make them pop.
Just bought this cartridge last week and was really disappointed. Wish I would have seen this post b4 I purchased and opened the package. From the outside of the box, I couldn't tell that the font was only upper case or that the "athlete" and "sport" options are exactly the same characters - one with open faces and one with solid faces. It's the same with the regular character and the "family" option. The hodgepodge stuff is just that - weird miscellaneous stuff - doesn't match the style of the rest of the cartridge at all. Glad it was on clearance!!!
ReplyDeleteThat is one of the reasons why I have been doing these write ups. The sample on the back doesn't tell the whole story. I'm sorry the car decals didn't work out for you - I ran into the same trouble with another cartridge. Next time you are considering a cartridge, check back here to see if I have covered it. If not, leave me a comment about which one you are considering and I'll try to do it for you :o)
DeleteThanks for your review. I think it really adds to the value of the blog to hear what others think.
Great information sharing. Really very helpful in making the decision regarding cartridge.
ReplyDeleteDesign With Vinyl
This is great information but since I am out of work I have to be very careful with my finances. Is there any way to download this information without paying for it? Do you get any of the money or does it all go to SCRIBD?
ReplyDelete