Sunday, December 2, 2012

Cricut Cartridge, Simply Charmed Overview

The holidays are at my heels and I have been off the grid with lots of projects and family time.  Thanksgiving came and went in the blink of an eye and now we have Christmas coming up fast.  I am very involved in the Holiday Gift Shop at my children's school, so all of my creative time has been dedicated to the bazillion details that make this event so magical.

That said I apologize for neglecting my blog and especially for failing to post a cricut cartridge comprehensive overviews for so long.  Today I am presenting the fun and broad ranging cartridge, Simply Charmed.  This was one of the first cartridges I purchased with my Expression and I definitely put some miles on it.  It has such a variety of images that I was able to rely on it for a good amount of time before I started investing in more cartridges. 

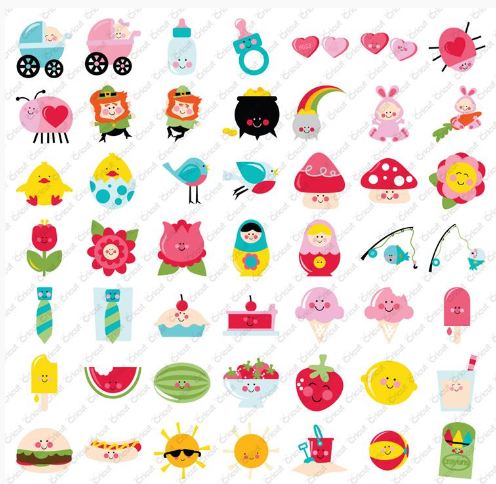
In this blog entry we will take a look at all the images and phrases on this cartridge.  We will discuss the cartridge format and there will be a table of contents PDF for you to download.  The table of contents contains all of the images or phrases included on the cartridge and their corresponding page numbers.

These are all of the images you can create with this fun cartridge.  There are 2 images per key on the overlay/ page in the handbook.  The first primary image can be retrieved by selected its key on the keypad and the second is cut by adding the shift key.  Each image is paired with a coordinated counterpart.  The bride and the groom, the moon and a star, pizza and a soda and Santa and a chimney are all examples of the pairings.

One of the greatest features of this cartridge is the number of layers it includes.  The more layers, the more dimension and variety in color.  Below is page 61 from the handbook which is related to Thanksgiving.
If we follow the color scheme as laid out in the the handbook, this is how the image is organized: We are looking at the turkey for this example which requires the shift key.

The primary image is the base and it is cut out in white.  All of the additional layers will be stacked on top of this aside from the shadow which will go underneath. The reason white is best for this base is because when it is fully assembled, the leg bones will not be covered by other layers and will appropriately be white.  The next key is "Layer 1" (with shift) which cuts out the drumsticks. "Layer 2" cuts out the body of the turkey. "Layer 3" cuts out the plate the turkey will rest on.  "Layer 4" will cut out the bed of lettuce that lays on the plate under the turkey.  Take note that the lettuce has a "plate shaped" lip on the bottom.  You will adhere your plate on top of this lip for proper placement.  The order of layering will look like this:
  • primary image
  • the body (there are slight cuts to indicate where to adhere the legs to the body)
  • the drum sticks
  • the lettuce
  • the plate
The final "layer" to the image is the shadow which you would place under the layered image to make the die cut pop which is especially helpful if you are putting it on top of white or patterned paper.

The last feature on this key/ page is the "phrase" which includes 1 layer for dimension (also known as the shadow.)  Below are all of the phrases included with this cartridge.
To view the entire handbook in pdf format, click here.

Below are a few examples of what you can create with this cartridge.  These samples and the card at the top of this blog entry were created by Jordan at CuteCuteWorld. Isn't her work adorable?
Last but not least, here is a list of all of the images and phrases on this cartridge with their page numbers.  If you find any errors in the spreadsheet, please let me know so I can correct them. If you would like to share this information on your blog, instead of copy and pasting this info, please paste a link to my site. The spreadsheet below is saved as a JPEG but you can download a PDF version of Simply Charmed here: 


Thursday, November 29, 2012

MUST, MUST see!!

I have watched this over and over and still can't get over the way this video makes me feel.  I thought I would share it with you so your day can get a bit brighter!


Sunday, November 18, 2012

Craft Supply Hoarder

There have been a lot of scrapbooking trends that I have gone bananas over and then never really used.  I blame HSN for some of it but mostly it is my own compulsive behavior.  I guess in some warped way I think that this cool new product will complete me as a human being.  Here is a list of 10 items that I HAD to have and are now collecting dust.
 1. WRMK Sew Easy-  I have a gazillion heads, enough thread to lace every shoe in America, the carrying case yet I do very little stitching.  I found that if I was going to go to all the trouble of pulling all the bits out, I might as well bring out the sewing machine.


2. Chipboard Letters - I'll use a set once but when I don't have a  letter that I need I dismiss the rest of the collection.  I know I could get creative about supplementing what is missing but I rarely make the effort. Why think when Micheal's is right down the street.  I know, pathetic.


3. Stamps - I have so many but because I am the gutter-ball queen of stamping, I rarely risk ruining a project by using them.  Look at all that black foam - no ink spots or remnants of paint. It is sad really.  These stamps have never fulfilled their destiny.
 

4. Ten Second Studios metal art products - I took a class; bought the starter kit and then I never used it. I love the concept but I just haven't made a project that calls for the look. Yes, that is my story and I'm sticking with it.

5. Maya Road mini albums - I have an assortment of the designs that have been released each season but I rarely use them.  I guess I'm more of a collector than a Maya Road crafter.  I even hang on to the chipboard embellishments because they are so stinkin cute.  I just can't bare to part with them.

6. Prismacolor markers - I invested a small fortune in these fancy shmancy markers but I rarely use them (this was before the Copic rage).  I could have stuck with crayola markers but at the time, it seemed critical that I had the very BEST, just in case I learned how to draw.
7. Xyron cartridges - I have the 1900 with multiple cartridges (laminate, laminate with magnet, removable and permanent), two 250 machines, 2, 150 "X"s and now a Creatopia but I rarely use them because I don't want to "waste" the adhesive.  Ridiculous.

8. Journalling Pens - I still can't stop buying journalling pens...as if the pen is magically going to change my chicken scratch into Heidi Swapp-like penmanship. Ha! That's a good one.
9. Ribbon - There were a few years when I couldn't go to Michael's without adding a spool of ribbon to my cart. Did I have a project in mind when I bought it? Nooooooo. I NEEDED a broad collection.... just in case.

10. Page protectors - I have no explanation for this compulsion.  I can only assume it is one of those squirrel instincts. One never want to be caught without the right size page protector that will fit into any hole configuration.  Am I right?
Maybe Bravo will come out with a reality show called "Craft Hoarders" and instead of helping you clean out your stash, they will teach you how to use all of your stuff like a pro.  Love that idea!!

Thursday, November 15, 2012

Basic Grey Warehouse Box sale arrived!!!

In case you are dieing to know what is coming your way or if you want to buy one, take a look:


I bought 2 but there is so much product that I am happy to sell the 2nd at cost. Leave me a comment if you are interested.  Here are photos of the 2nd Basic Grey Box that I am able to sell at cost;


Tuesday, November 13, 2012

She's at it again...

After digging through my photos to create my last post about my scraproom evolution, I am now wanting to move things around, yet again.  I really liked the open space when my desk was against the wall so I think I may be reorganizing today.  I am so blessed to have a scraproom but I don't use it every time I craft because it is so cluttered and tight in there.  I have got to work out a solution or I might as well surrender the room so my daughter can have her own bedroom.  Here is my current "BEFORE" photo. So sorry about the blurry imagine.  I took this pic with my phone after 2 cups of coffee.  I already have horribly shakey hands and coffee adds insult to injury.
I'll have to blend in my Cricut Imagine, scrap baskets and a cart full of supplies which are currently residing in my bedroom. Heavens to Murgatroid, I have a busy day ahead of me.

Sunday, November 11, 2012

Scraproom Evolution

Over the years I have had many spaces for my scrapbooking; lots and lots of set ups; dozens of interests and a heap of directives.  I used to sell kits, then I had a studio where I taught classes and held mini crops, then I opened a online shop, then I went to art school at the Academy of Art and all the while scrapping for hire.  I dug up a bunch of photos just for kicks.

This (below) was my 1st scrapbooking space back when we lived in our townhouse.  I had a huge room with a play area for my 3 year old son.  I'd set up the pack and play so my newborn daughter could take a nap...in theory.  I scrapped far less than I shopped - these were the days of QVC and HSC scrap-a-thons.  Nothing less than crack for me.


Below are my first few set-ups when we moved into our house.  It seemed like I was always moving things around.


Then I opened up a small studio in my garage (below).  I had started teaching classes at my son's school and at Michael's so I decided I would take it a step further and we transformed our garage into a super duper creative space.  It was wonderful, but freezing in the winter and scorching hot in the summer.


Then I started attending a bunch of workshops and I really got into mixed media.  I stopped teaching and holding small crops and started having friends over for "messy time".


Then I decided to go to art school.  I enrolled in the Academy of Art, downsized my stash,  and went back to my small craft room (below).


Then I got a drafting table and chair off of free-cycle!  Woo hoo - what a score!  But it took up a lot of space in the tiny room and I moved it a gazillion times trying to get the best configuration.


I was always searching for "innovative" supply storage solutions.  Some worked, some did not.


I think the industrial drawer unit is just not the bang for the buck I had wanted.  It takes up way too much space for the minimal storage it offers.


This (below) is what my space looks like today.  I feel so cramped in there, that I often bring a bunch of stuff to my bedroom and scrap on my bed.  One day I'll find the right arrangement.