That said I apologize for neglecting my blog and especially for failing to post a cricut cartridge comprehensive overviews for so long. Today I am presenting the fun and broad ranging cartridge, Simply Charmed. This was one of the first cartridges I purchased with my Expression and I definitely put some miles on it. It has such a variety of images that I was able to rely on it for a good amount of time before I started investing in more cartridges.
In this blog entry we will take a look at all the images and phrases on this cartridge. We will discuss the cartridge format and there will be a table of contents PDF for you to download. The table of contents contains all of the images or phrases included on the cartridge and their corresponding page numbers.
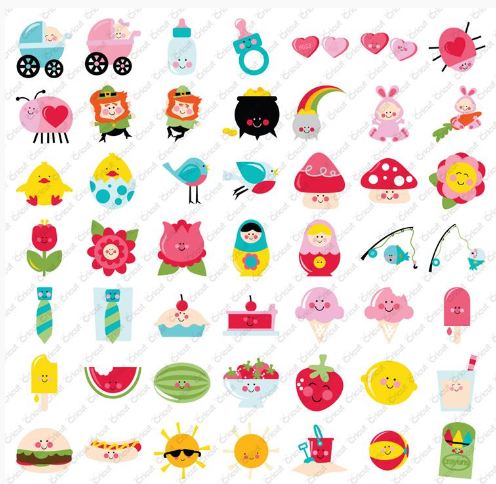
These are all of the images you can create with this fun cartridge. There are 2 images per key on the overlay/ page in the handbook. The first primary image can be retrieved by selected its key on the keypad and the second is cut by adding the shift key. Each image is paired with a coordinated counterpart. The bride and the groom, the moon and a star, pizza and a soda and Santa and a chimney are all examples of the pairings.
One of the greatest features of this cartridge is the number of layers it includes. The more layers, the more dimension and variety in color. Below is page 61 from the handbook which is related to Thanksgiving.
If we follow the color scheme as laid out in the the handbook, this is how the image is organized: We are looking at the turkey for this example which requires the shift key.
The primary image is the base and it is cut out in white. All of the additional layers will be stacked on top of this aside from the shadow which will go underneath. The reason white is best for this base is because when it is fully assembled, the leg bones will not be covered by other layers and will appropriately be white. The next key is "Layer 1" (with shift) which cuts out the drumsticks. "Layer 2" cuts out the body of the turkey. "Layer 3" cuts out the plate the turkey will rest on. "Layer 4" will cut out the bed of lettuce that lays on the plate under the turkey. Take note that the lettuce has a "plate shaped" lip on the bottom. You will adhere your plate on top of this lip for proper placement. The order of layering will look like this:
- primary image
- the body (there are slight cuts to indicate where to adhere the legs to the body)
- the drum sticks
- the lettuce
- the plate
The last feature on this key/ page is the "phrase" which includes 1 layer for dimension (also known as the shadow.) Below are all of the phrases included with this cartridge.
To view the entire handbook in pdf format, click here.
Below are a few examples of what you can create with this cartridge. These samples and the card at the top of this blog entry were created by Jordan at CuteCuteWorld. Isn't her work adorable?
Last but not least, here is a list of all of the images and phrases on this cartridge with
their page numbers. If you find any errors in the spreadsheet, please
let me
know so I can correct them. If you would like to share this information
on your blog, instead of copy and pasting this info, please paste a
link to my site. The spreadsheet below is saved as a JPEG but you can
download a PDF version of Simply Charmed here:


