

Showing posts with label Cricut cartridge. Show all posts
Showing posts with label Cricut cartridge. Show all posts
Monday, February 24, 2014
Fantabulous Cricut Challenge Blog - Your favorite colors...
This week's challenge on the Fantabulous Cricut Challenge Blog is "All about me - do a project with your favorite colors." I gotta tell you, I was a little blocked on this one. My son has been home sick for almost a week and as usual, I've caught what he has. I can't believe this sicky streak we have been on- it has really stymied my creativity. To combat my grey mood, I decided a strong wash of color was in order so my post for this week is this bold and beautiful flower cut from the Cricut cartridge Floral Embellishments.
I just don't use this cartridge enough. It has a lot of fun images that will work with so many different looks! The big bloom around this flower totally reminds me of my big hair (when I take the time to get dolled up). I really like the bright colors and outstanding charm this image affords. Certainly you could tone it down with another color palette but since it is all about me, I went with lively tones. I love the enthusiasm and excitement of this burst of color; even if I am feeling blah and meh from being sick.
Thursday, August 22, 2013
New Cricut Cartridge: Create a Friend
I am back from vacation and feeling so refreshed. I was so excited to learn about Cricut's new cartridge "Create a Friend" this morning! I never buy cartridge's at full price. I always wait for the big sale or buy them on ebay, but when I saw this cutie, I was REALLY tempted to put it in my shopping cart!!


I don't usually create scrapbooking pages with people die cuts but I am so inspired with these darling images! I also love the shadow design for the images and phrases. I probably wouldn't use gray as my background; I would probably use white. Either way, the effect is so clean and professional looking. If you would like a closer look at this gem of a cartridge, click below to tour the handbook:


I don't usually create scrapbooking pages with people die cuts but I am so inspired with these darling images! I also love the shadow design for the images and phrases. I probably wouldn't use gray as my background; I would probably use white. Either way, the effect is so clean and professional looking. If you would like a closer look at this gem of a cartridge, click below to tour the handbook:
Monday, July 29, 2013
Monday Challenge: "Shape Cards"
This week's challenge on the Fantabulous Cricut Challenge Blog is a to create a "Shaped Card." I have been looking forward to this week's challenge because I just purchased Wild Card 2. This is such a cool cartridge guys! It is so much better than any of the other Cricut "card" cartridges. The designs are dynamic and the card phrases aren't as cliche.

I selected an octopus looking monster card for my project so that the "shaped card" part was clear. The caption associated with this image is "Need a hand?" Not a greeting I'd use, but to each his own. I skipped the greeting all together and focused on making a colorful, dimensional, playful card that I could actually give to someone. I thought this design would be great for a kid's birthday.

I used pop dots to lift the top layer off of the base to give the card dimension and movement.
I made a few changes to the cartridge design for the face. I thought the original design was cute but too matchy-matchy. I wanted the card to feel a little more alive and googley eyes did the trick. My daughter's Jack-o-lantern smile inspired me to turn the mouth cut upside down. See the resemblance:


I really like the Cricut cartridge Wild Card 2 and am looking forward to making more of its great designs.
Sunday, July 14, 2013
Making Mini Albums! Fun, Fun, Fun!
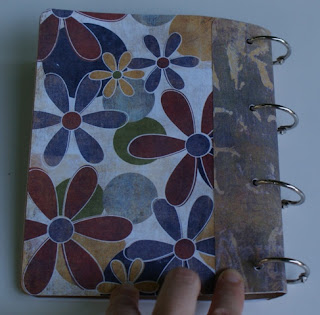
Last week at camp we made explosion boxes. I used the Cricut Cartridge "Mini Albums" to create the templates. I cut each shape out, traced it with a sharpie and photocopied the pages on cardstock. The kids went bananas over this project and their albums/ boxes were amazing! They used stickers, embellishments and drawings to decorate their pages with all kinds of colorful, happy, playful themes.

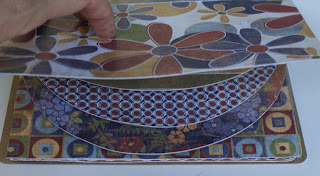
Since I had the cartridge out, I decided to play with some of the projects. What a fun cartridge!! I have had a blast these last few days creating my own explosion box, two accordion albums and a really, really nice book. I took a ton of notes so I can share what I learned plus offer tips and tricks to use the cartridge successfully. There is no reason for you to waste paper like I did learning how the sizes work and what kind of paper/ cardstock to use. I will share these findings later this week once I've written everything up. For now, here is a little eye candy to show you what you can do with this cartridge.


You don't have to own a Cricut to make this super cool project.
to download a template created by


EXPLOSION BOX


 |
| KaBoom! (It exploded) |
 |
| There are 32 pages (front and back) to decorate. |
 |
| This box is 3.75" in width when it is assembled. |
 |
| It is almost 12" wide when open. |
ACCORDION ALBUMS
 |
| These accordion albums fit into into darling albums. |
 |
| This project is 6.5" and the album is in a vertical orientation. |
 |
| This project is 4.5" and the album is in a horizontal orientation. |


(SO STINKIN' CUTE) MINI-ALBUM
 |
| I had no idea how stinkin cute this project would turn out! |


 |
| I love how the album includes envelope pages! |


Friday, July 5, 2013
Cricut Cartridge "Word Collage" - Cartridge Overview and Table of Contents
Before I get started I want to remind you that there are 2 more days of the 4th of July Fantabulous Cricut Crawl. It is Fantabulous Cricut Challenge Blog's version of a Blog Hop!! Click the link above to find out all the details and start crawling to all kinds of giveaways. Speaking of giveaways I am having a big one.

Ok, It is finally time to take a closer look at the Cricut cartridge, "Word
Collage." I thought I'd have this post up on Wednesday but with the
holiday, I didn't have much time to write in peace and quiet. This cartridge
has a lot of really cool collages and it has a ton of potential. Out of
the 50 different collages on the cartridge, I, personally, see 27 that I
could potentially use based on my photographs and possible paper
crafting needs.

That is how I almost always pick out cartridges. I look through the handbooks page by page and actually count how many of the images I could potentially use based on my life and the photos I have not yet scrapped. If the % is high, I buy it.
Since Word Collage qualified for purchase per my "statistical assessment", I was able to put it in my cart with a clear conscience. When I got it home, I popped it into my Expression and proceeded to cut out the baby girl collage at 4" with pink cardstock. My blade started tearing the edges of some of the letters on the very first line so I did some tinkering with the blade depth, speed and pressure.
I still had difficulties. Since the blade was 2 weeks new, I crossed that off the list of potential problems. I tried switching the type of paper but that just brought about more issues of one form or another. When I upped the size to 5" there was improvement but not the perfectly clean edges one would hope for. That is when I got bored and filed the cartridge away.
Fast forward a couple of years to present day. I had my first design team project for Fantabulous Cricut Challenge Blog - Create a project using red, white and blue. Several of the DT members had already submitted their projects so I had a sense of which cartridges were being used. I wanted to do something unique... to use a cut that was off the beaten path...Hmmmm...Word Collage came to mind.

I knew I'd need to do some test cutting before I got started so I picked a scrap of Bazzil cardstock, some thin Core'dinations cardstock and a scrap of K&Co double sided patterned paper to see what worked and what didn't. In each case, I had problems of one sort or another. I replaced the blade, adjusted the various setting and changed the size. Even at 6.5" I still had trouble with thin font letters; curves like in "S" and with smaller holes like in the capital letter "A".
My original vision had been to cut the collage out of a red, white and blue sheet of paper from the Danny O collection and use the negative on top of a solid sheet of silver paper. Because of the relentless tearing and fraying, the negative image always had multiple flaws.
This simply would not due. I decided to go another route. I used the positive of the cut - the words and letters - and adhered that on top of parchment looking cardstock. To remedy the damaged letters problem, I cut the 4th of July collage out multiple times giving me an "inventory" of letters to draw from to replace those that were torn or frayed.
To maintain the collage design, I placed my paper face down on the mat and flipped the image on my Cricut.

When the image was cut, I removed the negative, added adhesive to the letters with a Zig glue marker, and placed my background paper face down on top of the collage. I used a brayer to secure the letters to the background sheet and carefully peeled back the paper making sure the letters were glued to the background paper and were not sticking to the mat .
 Tah-Da! The collage transferred perfectly and maintained the cartridge's design.
Unfortunately, the finished effect was extremely flat and uneventful. After all of that work, I was really disappointed! I was so darn invested by this point that I decided I had to make it work. I added a second layer of letters and in some key words, I sliced foam squares to lift the letters off of the first layer.

I had to cut two more sets of the 4th of July collage using the same Danny O paper to have enough letters to create a complete second layer. The most time consuming part of the entire project was laying down those letters.
I used a Zig fine tip adhesive pen to add glue for the flat layer and carefully laid down each letter with tweezers. I used a micro-tip pair of scissors to cut the foam squares thin enough to fit under the raised letters which I placed by hand. I raised the words America, 4th, Fireworks, 1776 and Independence Day.
To pull everything together, I mounted the background sheet on top of a different patterned paper from the Danny O collection and paper from the Simple Stories, Happy Day Birthday Memories collection.
 Now for some information about working with this cartridge. I am using a Q and A format to share what I now know.
- I want to use the negative of a collage but I keep getting tears, frays and scrunched up edges. How can I prevent this?
You can slow down the speed but the only consistent fix I came across was to increase the size. The bigger the cut, the better Cricut handles the details.
-When I use the negative, some of the letters are difficult to make out because they only have the outer edge to define them.
Yes, you must remember to transfer over the middle parts of “A, B, D, O, P, Q, R, a, b, d, e, g, o, p, q." Sometimes they look like small scraps on your mat so make a note on a yellow sticky sheet and put it on your Cricut to remind yourself to pull them off first thing and store them somewhere away from your work area until you are ready to glue them down. Five minutes after removing those parts and putting them aside for later, I tossed my pile of innards thinking they were trash.
- When I try to remove the negative, some of the letters are attached.
The Cricut tool kit includes a very cool straight edged craft knife that does a great job at cutting those small attachments. If you don’t have one, just use your craft knife.
- I want to use the positive word collage (i.e. – the letters / words) but how can I replicate the design?
There are a couple of ways to do this. The first is to take the negative and tape it with not-too-sticky-tape (so it doesn’t tear your paper when you remove it) in the place you want the design and transfer each letter into its place in the negative image. This does present a couple problems however:
I got a lot of great information from the comments section on my last post and from the Cricut MB. I heard from many Cricut users that vinyl is the best material for cutting out a collage They used their cut vinyl on chargers, canvas and in a floating frame. Some Imagine owners just used the cartridge to print the collage. A few Word Collage users mentioned that they used the "hide contours" option on their Gypsy and in CCR to make space for photos or images or other words. Clever!
I hope this information is helpful. There is so much more to learn about this cartridge but in my opinion it really is a need to know task. When I need to know it, I'll learn it.

To enter, click HERE to win this!

That is how I almost always pick out cartridges. I look through the handbooks page by page and actually count how many of the images I could potentially use based on my life and the photos I have not yet scrapped. If the % is high, I buy it.
Since Word Collage qualified for purchase per my "statistical assessment", I was able to put it in my cart with a clear conscience. When I got it home, I popped it into my Expression and proceeded to cut out the baby girl collage at 4" with pink cardstock. My blade started tearing the edges of some of the letters on the very first line so I did some tinkering with the blade depth, speed and pressure.
I still had difficulties. Since the blade was 2 weeks new, I crossed that off the list of potential problems. I tried switching the type of paper but that just brought about more issues of one form or another. When I upped the size to 5" there was improvement but not the perfectly clean edges one would hope for. That is when I got bored and filed the cartridge away.
 |
I knew I'd need to do some test cutting before I got started so I picked a scrap of Bazzil cardstock, some thin Core'dinations cardstock and a scrap of K&Co double sided patterned paper to see what worked and what didn't. In each case, I had problems of one sort or another. I replaced the blade, adjusted the various setting and changed the size. Even at 6.5" I still had trouble with thin font letters; curves like in "S" and with smaller holes like in the capital letter "A".
My original vision had been to cut the collage out of a red, white and blue sheet of paper from the Danny O collection and use the negative on top of a solid sheet of silver paper. Because of the relentless tearing and fraying, the negative image always had multiple flaws.
 |
| You can see the rips in "N", "T", "C", "R" and "I", |
To maintain the collage design, I placed my paper face down on the mat and flipped the image on my Cricut.

When the image was cut, I removed the negative, added adhesive to the letters with a Zig glue marker, and placed my background paper face down on top of the collage. I used a brayer to secure the letters to the background sheet and carefully peeled back the paper making sure the letters were glued to the background paper and were not sticking to the mat .

Unfortunately, the finished effect was extremely flat and uneventful. After all of that work, I was really disappointed! I was so darn invested by this point that I decided I had to make it work. I added a second layer of letters and in some key words, I sliced foam squares to lift the letters off of the first layer.

I had to cut two more sets of the 4th of July collage using the same Danny O paper to have enough letters to create a complete second layer. The most time consuming part of the entire project was laying down those letters.
I used a Zig fine tip adhesive pen to add glue for the flat layer and carefully laid down each letter with tweezers. I used a micro-tip pair of scissors to cut the foam squares thin enough to fit under the raised letters which I placed by hand. I raised the words America, 4th, Fireworks, 1776 and Independence Day.
To pull everything together, I mounted the background sheet on top of a different patterned paper from the Danny O collection and paper from the Simple Stories, Happy Day Birthday Memories collection.

- I want to use the negative of a collage but I keep getting tears, frays and scrunched up edges. How can I prevent this?
You can slow down the speed but the only consistent fix I came across was to increase the size. The bigger the cut, the better Cricut handles the details.
-When I use the negative, some of the letters are difficult to make out because they only have the outer edge to define them.
Yes, you must remember to transfer over the middle parts of “A, B, D, O, P, Q, R, a, b, d, e, g, o, p, q." Sometimes they look like small scraps on your mat so make a note on a yellow sticky sheet and put it on your Cricut to remind yourself to pull them off first thing and store them somewhere away from your work area until you are ready to glue them down. Five minutes after removing those parts and putting them aside for later, I tossed my pile of innards thinking they were trash.
- When I try to remove the negative, some of the letters are attached.
The Cricut tool kit includes a very cool straight edged craft knife that does a great job at cutting those small attachments. If you don’t have one, just use your craft knife.
- I want to use the positive word collage (i.e. – the letters / words) but how can I replicate the design?
There are a couple of ways to do this. The first is to take the negative and tape it with not-too-sticky-tape (so it doesn’t tear your paper when you remove it) in the place you want the design and transfer each letter into its place in the negative image. This does present a couple problems however:
- You have to apply adhesive to each letter individually or else squirt it in the empty spaces inside of the negative but then you run the risk of the adhesive seeping and gluing the negative to your paper. You could run the letters through the “X” xyron, but that is a lot of work too.
- Your letters may not have consistent angles. Even with tweezers, it is really difficult to place each letter exactly in its original place.
- Place your paper on your mat face down and use the scraper or a brayer to secure all of the paper to the mat.
- FLIP or MIRROR the collage and cut.
- Once it is done, place adhesive (I used Zig) all over the back.
- Remove the negative and place your background paper on top of the mat/ word collage.
- Flip it over and use your scraper/ brayer to secure the letters to the mat paper.
- Slowly lift your mat rolling towards your body from the top to make sure each letter is adhered down. If letters lift up with the mat, lay the mat back down and brayer again in that spot.
- Once you have removed the mat completely, place the plastic cover used for the mat on top of your collage and brayer again.
- If any of the letters fall loose or don’t seem like they will stay put, place the negative over your collage so it fits, add additional adhesive on the back of the letter and put it in its place.
- You MUST remember to FLIP/ MIRROR your image on your Cricut AND you MUST remember to place your paper face side down. It seems obvious, but believe me, it is an easy mistake. I blew it twice.
- This process will be VERY difficult if you are trying to use patterned paper as your mat because it is really hard to lay the collage down vertically with precision. It is doable with a T square or with some serious forethought but not a simple 1, 2, 3.
I got a lot of great information from the comments section on my last post and from the Cricut MB. I heard from many Cricut users that vinyl is the best material for cutting out a collage They used their cut vinyl on chargers, canvas and in a floating frame. Some Imagine owners just used the cartridge to print the collage. A few Word Collage users mentioned that they used the "hide contours" option on their Gypsy and in CCR to make space for photos or images or other words. Clever!
I hope this information is helpful. There is so much more to learn about this cartridge but in my opinion it really is a need to know task. When I need to know it, I'll learn it.
Last but not least, here is a list of all of the words and phrases on this cartridge.. If you find any errors in the spreadsheet, please
let me
know so I can correct them. If you would like to share this information
on your blog, instead of copy and pasting this info, please paste a
link to my site. You can
download a PDF version of Word Collage here:
Subscribe to:
Posts (Atom)