- a sample view of the cartridge images
- a list of the various themes this cartridge can work with
- a project challenge
- a look at a few handbook pages with some explanation of the possibilities
- a link to the PDF of the handbook
- photos of image layers assembled
- a spreadsheet with a list of the images, words and phrases, cards and projects with their pages numbers including a link to download the PDF version.
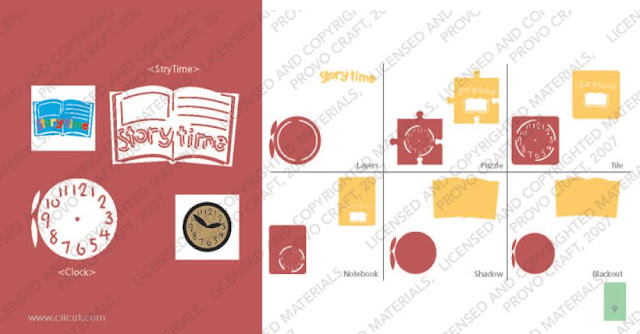
This is the sample sheet Provocraft prints on the back of the box. Usually their cartridge sample sheets do not show all of the images on the cartridge but on "My Community" they do. There are 98 layered images with a shadow and a blackout plus a puzzle piece, a tile and a notebook page. I love the range of topics. You could use this cartridge for so many different themes:
- school
- heritage
- baby
- Christmas
- Games
- projects with kids
- nursery rhymes
- family
- animals / farm
- home
- travel /road trip
- Easter
- Thanksgiving
- people
- nature
- community
- railroad and trains
- vehicles
- firemen
- policemen
- shopping
- ice cream/ candy
- going out to eat
- library
On the page above, which has a matching key on the cartridge overlay, your two primary images are of a police station facade and a policeman (key with shift). Add the "Layers" feature key and Cricut cuts 2 light posts and a piece of building trim as another layer for the police station. With shift, Cricut cuts the policeman uniform. Add the "Shadow" or "Blackout" feature key to cut layers to be placed under the primary image. The "Puzzle," the "Tile" and the "Notebook" feature keys produce the primary image within a puzzle piece, a tile and a notebook page.
To see and download the entire handbook, click here.
Sometimes cutting and layering an image isn't as easy as it looks. Since I want to offer a truly comprehensive overview of the cartridges, I thought I would cut the two main images from page 9 to see how all the layers work together.
The clock above was assembled with the primary image and the Layer. The clock hands come from the Layer - they seem to be a little large for the clock but could be trimmed and attached with a brad. The clock face below is made with the primary image, the Layer and the Shadow. For the hands, I used the primary and the Layer image hands stacked.
The image below is made with the primary image with the shift key (the white), the Layer with shift (the letters that spell story time), the Shadow (light brown) and the Blackout (dark brown).
In order to get the multi-color spelling, I had to cut the Layer 5 times, 1 in each color.
There is not a way to isolate the letters so that you can get multiple colors with one cut unless you use the hide contour feature on Design Studio, Gypsy or Cricut Craft Room.
To do this, you would press "Layer" 5 times and then use the hide contour feature to hide all but 2 of the letters on each of the 5 copies. Then you would place scraps of paper for each colors on your sticky mat to match the location on your virtual mat. By doing this, you are not left with a pile of extra letters like shown above.
I cut the story book image at 2.5 inches. Because the die cut is rather small, the light brown shadow under the primary image does not show through very well to create contrast that appears like lines of text. With inking or Copic markers you can create this look manually.


Wow this is awesome, I have always liked My Community but thanks for the inspiration to pull it out again. And I just became a follower of your blog
ReplyDeleteNana Dona
nanadonnascarddreams.blogspot
Hi Jillienne. Can you explain why some of the images don't make complete cuts. They seem like they are going to cut out for the layers, but they don't cut the final side to remove the piece. It's difficult to explain. An example is the cat in My Community. It makes cuts for the inner ear & mouth, but doesn't cut it out all the way so you can layer. How does this work? Thanks in advance,
ReplyDeleteBecky
Hi becky - What size are you cutting? I took a look at the handbook and it should cut out the ear patches on the primary cut so you can see the color from the cut you get with "layers" (the layer goes under rather than on top) If you image is on the smaller side, the machine might not make a full cut because it is too small. I've had this happen on many other images. The smaller the image, the less detail the machine is able to cut. Perhaps you could color inside of those slots with a marker or cut a super small patch to layer on top. I'm sorry I cannot be more help. Best of luck...Jilliene
DeleteMaybe I was cutting the layer by accident. I'll try it again. Thanks so much for your help!
Delete