Showing posts with label layers. Show all posts

Wednesday, October 24, 2012

Telling a story with clusters...

 Lately, I have been all about layering clusters.  I love this technique because it allows me to tell a story and convey a vibe specific to the photos.  I tend to be the kind of scrapper that tries to communicate a lot visually.  For me, this kind of scrapping takes forever.  It is kind of like making a mix tape in practice - it is personal, intimate, revealing and emotional.  In order to summarize the photos so that they speak my truth, I have to work in drafts.


I create the first draft without adhesive nor cropping and I walk away. I need time to digest what I've done and to revisit it with a fresh pair of eyes before I commit to the design. I usually take a photo with my phone so I have the raw page to reference as the layout evolves.

When I return to the project, usually the next day, I do a little tinkering and then I start cropping, inking and gluing.  During this session, I usually rearrange things to see if there is a better way to say what I want to say, and if not, I just refer to my photo to return to the original plan.  Then I walk away again.

The third session is usually my last although I always have post layout tweaks.  A lot of times I deconstruct the layout and use the core in a different way.  Often I switch out the background paper or turn the design horizontal versus vertical.  This is also when I add my journalling, doodling and other "risky" touches.  It never fails - I almost always wreck something during this phase.  Either I smudge ink or tear a paper or put down a stamp that doesn't imprint correctly.  So this is when I change the design a little to cover up my boo boos.  Sometimes it works, sometimes it doesn't.  I keep hoping I'll outgrow it.


Once the pages are done, I take photos of them.  It isn't until after the photos that I notice a awkward negative space or an embellishment that doesn't work . Sometimes, I don't end up posting the pages because I don't feel like taking another picture after I've addressed the problem.  Other times, I post what I have already taken and hope no one notices.  Very rarely do I fix the issue and then re-take the photo.  I guess I get burnt out on the layout by that time.

I don't do this for every layout mind you.  And almost never with mini albums.  Sometimes I sit down with a stack of photos and crank out multiple pages in a short period of time.  Usually these layouts include store bought 3-D embellishment or standard cricut cuts and minimal journalling.  I like this process too.  There certainly is a feeling of satisfaction in putting the pages in the sleeves right away!

No matter what style you do, the whole point has to be about having fun, right?  I've tried to put those days of agony, trying to create a layout for everyone else but me, behind me.  That kind of scrapbooking undermines the entire hobby.  I have gotten lost in what other people might think, and forgotten everything about the story - the event - the photos.  This is why I am enjoying cluster layered scrapbooking these days.  Even if it doesn't work for the viewer, you know what it means.  You feel the satisfaction of creating something that comes from inside of you.

Wednesday, September 5, 2012

Comprehensive Overview of Cricut Cartridge Florals Embellished

Today we are going to take a look at the Cricut Cartridge, Florals Embellished.  To be honest, I have been procrastinating on covering this cartridge because it has so many images that are difficult to define other than labels like "big flower," "flower with 8 layers," "side profile of flower with stem" which is not very helpful in a "cheat sheet."  I knew that in order to really dissect Florals Embellished I was going to have create a visual reference rather than a literal one.  I invite you to print out the Image Quick Reference PDF I provide for download to help you navigate all of the beautiful artwork you get with this cartridge.

In this post we will look at:
  • the Sample on the back of the cartridge box
  • a visual reference of all of the primary images and a PDF download
  • a visual reference of all of the phrases and a PDF download
  • handbook page information
  • a link to the handbook PDF
  • the cartridge table of contents with page numbers
This sample is just a sprinkling of the images, phrases and silhouettes included on the cartridge but it does reveal that the phrases are very mother-centric and also gives you a sense of the font they use. 
 
Below is a view of all of the primary images on the cartridge.  Each includes a small view of the overlay with the image's button location highlighted in red.  I find this detail to be extraordinarily important.  I cannot tell you how challenging it can be to discern which button to push when there are similar designs on one cartridge.  And when you start cutting layers and using feature keys, the identification process can be even more difficult.
 
 
You can download a PDF copy of the Florals Embellished Image Reference Sheet by clicking the link below. If you would like to share this information on your blog, instead of copy and pasting this info, please post a link to my site.

Next, let's take a look at all of the phases on this cartridge.  Below you can see all of the phrases in color and already layered which gives you an idea of what they look like completed.
 This next view of the phrases is in black and white and the layers are separated allowing you to imagine the phrases using your own color palette.
You can download a PDF copy of the Florals Embellished Phrase Reference Sheet by clicking the link below. If you would like to share this information on your blog, instead of copy and pasting this info, please post a link to my site.

I made the flower above using my Imagine.  Instead of piecing different colored paper on my cutting mat, I used a sheet of white cardstock and designated colors for each layer which Imagine then printed.  Below is the handbook page for this flower. Lets take a look:
This image has a total of 7 layers to cut including the shadow.  To duplicate this image, that means 7 different colored sheets of paper.  The result is a beautifully detailed embellishment.  There is also a phrase (as discussed earlier) and a two layered silhouette.  Below is an example of the silhouette which I found on the Created by Honeybee blog.  It is just 2 layers and is simplistically elegant.
Here is a link to the Florals Embellished handbook PDF.   Below you will find a "table of contents" for Florals Embellished.  It has every image and phrase you will find on the cartridge along with its corresponding page number. If you find any errors in the spreadsheet, please let me know so I can make corrections. If you would like to share this information on your blog, instead of copy and pasting this info, please paste a link to my site. The spreadsheet below is  a JPEG but you can download a PDF version by clicking here:
 
Thanks so much for popping in.  Let me know what you think about this cartridge and if you would like a specific cartridge covered on my blog.


Sunday, August 5, 2012

Overview of the Cricut Cartridge "My Community"

Today I will be talking about at the Cricut cartridge "My Community" and I will offer a project challenge.  If you have never looked at this cartridge you are in for a treat!  In my opinion, this is one of the most versatile and applicable cartridges Cricut offers.  I can't wait to show you what you get to play with.  In this post you will get:
  • a sample view of the cartridge images
  • a list of the various themes this cartridge can work with
  • a project challenge
  • a look at a few handbook pages with some explanation of the possibilities
  • a link to the PDF of the handbook
  • photos of image layers assembled
  • a spreadsheet with a list of the images, words and phrases, cards and projects with their pages numbers including a link to download the PDF version.

This is the sample sheet Provocraft prints on the back of the box.  Usually their cartridge sample sheets do not show all of the images on the cartridge but on "My Community" they do.  There are 98 layered images with a shadow and a blackout plus a puzzle piece, a tile and a notebook page.  I love the range of topics. You could use this cartridge for so many different themes:
  • school
  • heritage
  • baby
  • Christmas
  • Games
  • projects with kids
  • nursery rhymes
  • family
  • animals / farm
  • home
  • travel /road trip
  • Easter
  • Thanksgiving
  • people
  • nature
  • community
  • railroad and trains
  • vehicles
  • mail
  • firemen
  • policemen
  • shopping
  • ice cream/ candy
  • going out to eat
  • library
PROJECT CHALLENGE - I was returning library books the other day and as I drove past our local park, I saw our mail carrier eating her lunch in the shade and thought; "I need a scrapbook of our neighborhood!"  It would be so fabulous to show my grandchildren where their parents grew up and perhaps, how we lived "in the olden days."   So over the next few days I am going to head out on foot to take photos of the people and places that are a part of our lives. Then I am going to scrapbook these photos using the "My Community" cartridge.  I invite you to join me, and, if you'd like, post a link to photos of your project.  Doesn't that sound like fun! You could do this in your Smash Book, as a mini album, as one or several layouts or in your journal.  I'd love to see what you come up with!

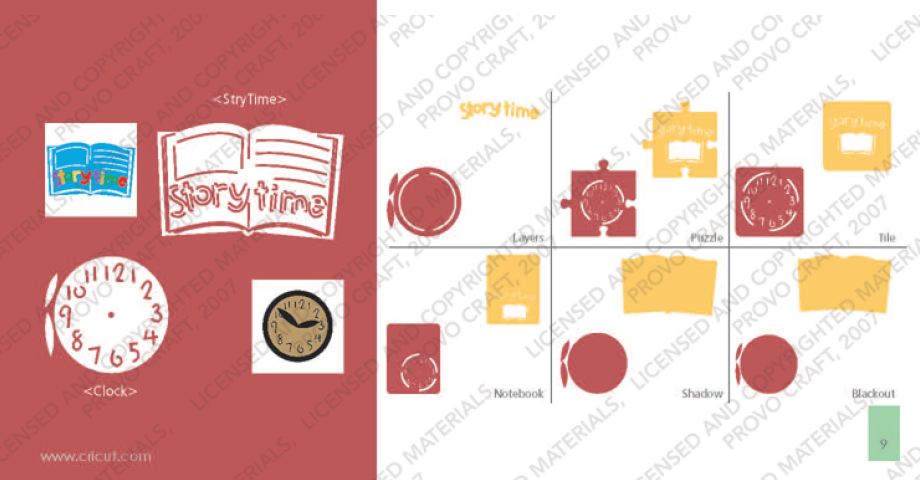
On the page above, which has a matching key on the cartridge overlay, your two primary images are of a police station facade and a policeman (key with shift).  Add the "Layers" feature key and Cricut cuts 2 light posts and a piece of building trim as another layer for the police station. With shift, Cricut cuts the policeman uniform.  Add the "Shadow" or "Blackout" feature key to cut layers to be placed under the primary image.  The "Puzzle," the "Tile" and the "Notebook" feature keys produce the primary image within a puzzle piece, a tile and a notebook page.

To see and download the entire handbook, click here.

Sometimes cutting and layering an image isn't as easy as it looks.  Since I want to offer a truly comprehensive overview of the cartridges, I thought I would cut the two main images from page 9 to see how all the layers work together.
The clock above was assembled with the primary image and the Layer. The clock hands come from the Layer - they seem to be a little large for the clock but could be trimmed and attached with a brad.
The clock face below is made with the primary image, the Layer and the Shadow.  For the hands, I used the primary and the Layer image hands stacked. 

The image below is made with the primary image with the shift key (the white), the Layer with shift (the letters that spell story time), the Shadow (light brown) and the Blackout (dark brown).

 
In order to get the multi-color spelling, I had to cut the Layer 5 times, 1 in each color.


There is not a way to isolate the letters so that you can get multiple colors with one cut unless you use the hide contour feature on Design Studio, Gypsy or Cricut Craft Room.

To do this, you would press "Layer" 5 times and then use the hide contour feature to hide all but 2 of the letters on each of the 5 copies.  Then you would place scraps of paper for each colors on your sticky mat to match the location on your virtual mat.  By doing this, you are not left with a pile of extra letters like shown above.

I cut the story book image at 2.5 inches.  Because the die cut is rather small, the light brown shadow under the primary image does not show through very well to create contrast that appears like lines of text.  With inking or Copic markers you can create this look manually.

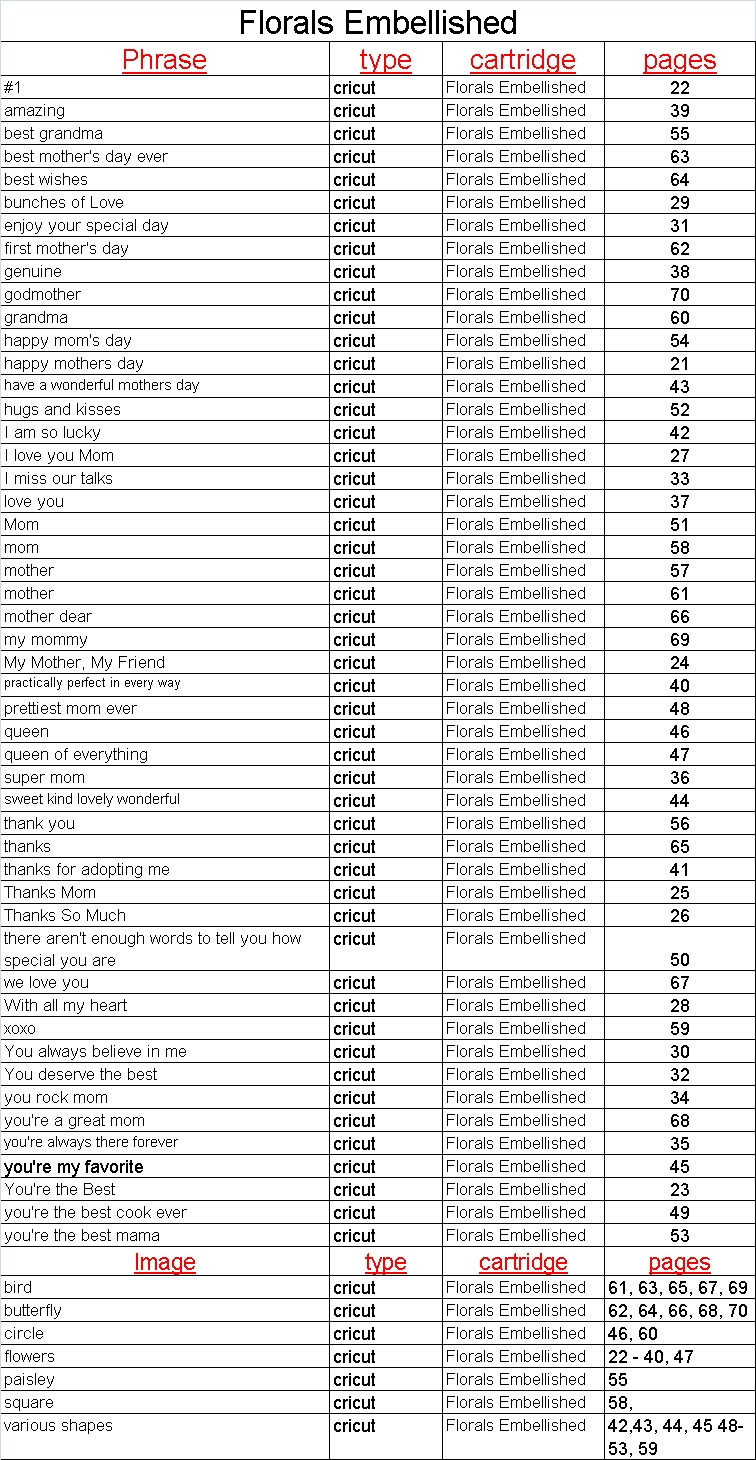
Last but not least, here is a list of all of the images and phrases on this cartridge with their page numbers.  If you find any errors in the spreadsheet, please let me know so I can correct it. If you would like to share this information on your blog, instead of copy and pasting this info, please paste a link to my site. The spreadsheet below is saved as a JPEG but you can download a PDF version of My Community here:


Tuesday, July 31, 2012

Cricut Cartridges Lessons Learned

Do you have one of these?  This is my box of Cricut "learning opportunities."  These are the cuts I have made that didn't work out.  Sometimes the paper color combinations where out of whack or the layer sizes were off.  Once in a while my mat wasn't sticky enough so the paper moved or I didn't set the pressure / speed/ blade correctly.  There were times when the cute little image didn't work with the font or the awesome layered font didn't work with the image.  I could go on and on about potential Cricut boo boo's but everyone has their own kind of "happy accidents" since they are part of the design process.  What I have learned is to keep track of common errors in a little notebook I keep next to my machine.  I call it my "Lessons Learned Journal."

I know it seems like a hassle to jot down information while you are in the creative zone but I must tell you it is one of the most powerful tools I have to use with my Cricut.  What happens for me is that I go into a trance when I am creating and I start to make unconscious decisions.  When an idea doesn't work, I move on to the next and then sometimes, later on, I try the same idea again not realizing that I had already tried it once before. Or, sometimes I do something and it works fabulously but I cannot remember how I did it and have to goof around a while until I am able to figure it out.  By jotting down little tidbits of information, I become more conscious of my process and I continue to move forward with ideas rather than getting stuck in a loop.

These notes do not have a formula nor do they require a logical organizational system.  They are thought doodles - shorthand for artists - and, in my opinion, a must for the regular Cricut crafter.  Below is a brief list of the kinds of information I record:
  • project name or descriptive identifier
  • date
  • cartridge(s) used, page number(s), and creative feature settings
  • types of paper
  • SIZE, SIZE, SIZE - how tall, how wide - don't forget to write down the size!
  • Margins and placement measurements
  • pressure, speed, blade
  • best way to remove the cut from the mat (important for highly detailed cuts)
  • colors best for matting and inking (ie - black, white, dark brown, etc.)
  • best method for adhering image (xyron, glue dots, tape runner, liquid glue, etc.)
  • font width, welding and layer information
  • alternate options on other cartridges
  • how all the layers work together and if each one is necessary to create the look you want.
Any detail that you learned while working with a cartridge is worth noting and sharing.  Whether you post it on the Cricut message board or in the comments section of the cartridge overview on my blog, share your knowledge if you can.  There is no point in another person ruining a sheet of Bazzil cardstock if it can be avoided.

Here are a few of the lessons I learned while using the Enjoy the Season's cartridge on my last project:
  • clean your Imagine heads regularly while printing out your images or you will get streaks.
  • if you create images that are going to go off the page, print the same image again only flip it horizontally so you can adhere it on the back of the original image.  This way, when you turn the page, you won't see a white die cut jetting out but rather a continuation of the previous design.
  • look at the selected image on your virtual mat before cutting to make sure the size is relative to the other cuts you have made. 2.5 on one image can appear much different on another.
  • when you are trying to figure out the right size for an image, you can change the Imagine setting to "cut only" so you can tinker without wasting ink.
Do you have some valuable information to share about working with the "Enjoy the Seasons" cartridge?  Please post it in the comments section of this entry!  In fact if you have tips for any of the cartridges I have covered, please share them with that entry.  Your experiences might save someone else a ton of time and keep them from that frustration that comes with learning something knew!

Sunday, July 15, 2012

Content Overview of Cricut Imagine Buccaneer Cartridge

Ahoy mateys- today I will be providing a comprehensive overview of the Cricut Imagine cartridge, Buccaneer.  This cartridge can only be used with the Cricut Imagine which means that it prints out artwork and then it cuts it.  Buccaneer has a very different style than any of the other cricut cartridges.  In fact it is this uniqueness that motivated me to buy it.  In this post, we will be looking at:
  • the "Sample" that Provocraft prints on the back of the box
  • the papers and patterns that come on the cartridge
  • several pages out of the handbook with detailed explanations
  • a sneak peek of all of the layered images
  • the included projects
  • and a spreadsheet that includes each phrase, word and image with the corresponding page number


Above is the "Sample" that Cricut prints on the back of the cartridge box. Unfortunately, it shows only 9 of the layered images out of the 40 on the cartridge.  That number does not even include the individual layers for each image, the phrases, projects and icons.  Below you can see all of the layered images included.

To see the images and their layers take a look at the handbook by clicking here.


Next you will find 2 more pages from the handbook: 
These are the Projects - perfect for a pirate party:
These are 4 of the 10 icons:
And last but not least,  here is a list of all of the images and phrases on this cartridge with their page numbers.  If you find any errors in the spreadsheet, please let me know so I can correct them. If you would like to share this information on your blog, instead of copy and pasting this info, please paste a link to my site. The spreadsheet below is saved as a JPEG but you can download a PDF version of Buccaneer here: