
As I mentioned in my last post, the WRMK Washi Tape Dispenser sold
out on HSN before I was able to snatch one up. This, of course, made me
obsessed with getting a dispensor elsewhere. I can't explain why this
happens to me, but when I get something in my craw (what is a craw
anyway?), I can't seem to let it go. So I scoured the internet for an adequate, yet
cost effective substitute...

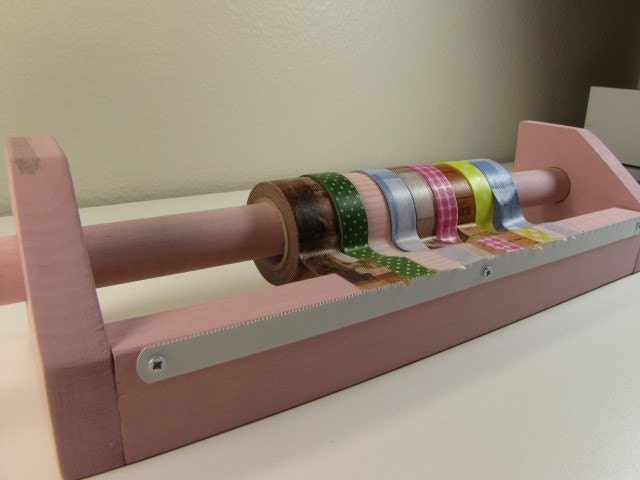
I had a super simple idea, but I assumed that if I hadn't come across it during my research, then it probably had been tried and the idea was a dud. I gave it a try any how and guess what? It worked!


I found a lot of neat inventions on Pinterest...
...and some really cool products on Etsy,
...but nothing that set my hair on fire.
I had a super simple idea, but I assumed that if I hadn't come across it during my research, then it probably had been tried and the idea was a dud. I gave it a try any how and guess what? It worked!

Here are instructions on how to make a super simple washi tape dispenser.

1. Find an empty aluminum foil, wax paper or plastic wrap box. Try to use a box that has a serrated edge on the bottom just like a scotch tape dispenser otherwise ripping the tape off may be awkward.

2. Remove the tube inside and slide a roll of tape on it to make sure it fits. It is OK if the roll of tape is loose on the tube but keep in mind that the looser it is, the less tension you'll have on the individual rolls of washi tape.

3.
Place packing tape on the front lower half so when you extend the tape
tail from the roll and set it on the box edge, you can easily lift it
off the box without the washi sticking to the box paper.

4.
Now reinforce the box with packing tape or go wild and collage with
washi tape. This will make the box more durable and if you use washi
tape you will have quick reference as to which tape is the box.
Since writing this original post, I have come upon an upcycle for single rolls of Washi tape. You can find the tutorial here.

Great idea and tutorial! I have to try it out.
ReplyDeleteVery clever!
ReplyDeleteWhat a great idea. TFS
ReplyDeleteWhat a great idea, TFs :)
ReplyDeleteYay for recycling too!
ReplyDeleteLove your hanger idea! WHO DOESNT HAVE A HANGER! Super Cute!
ReplyDeleteI can't take credit for the hanger. I pulled that idea from Pinterest and now i can't find the original post to give credit to the person who made it.
DeleteThis is awesome :)
ReplyDeletewhen I saw the pink wooden one you showed, I was thinking...a tin foil container would work..scroll down and you made it :)
Great tutorial as well :)
I have linked this post to a facebook group called 'show us your craft space and ideas'I hope that was ok. It really is a good idea
ReplyDeletelove Chris
absolutely! Thanks for visiting and passing my blog on! :o)
DeleteI have posted a link to this on a facebook group I belong to called 'show us your craft space and ideas'. This idea is brilliant and I'm sure many other people will agree
ReplyDeletethank you
love Chris
Great recycling idea. Thanks
ReplyDeleteThank you for popping in. I just love repurposing!
DeleteGreat recycling idea. Thanks
ReplyDeleteOMG, I love this!! Thank you so much for the idea and great repurposing! :)
ReplyDeleteThank you! Now I have a good excuse to add to my washi collection. Gotta fill up that box!
ReplyDeleteLove your idea on creating an even better more portable washi tape dispenser than the one that was on HSN!
ReplyDeleteI just finished making my Washi Tape Box. Thanks so much for sharing!! What a wonderful way to keep it all together and recycle, too. Love it!!
ReplyDeleteThis is genius! There’s no hassle looking for the other tapes since they’re all cued together. Your project is really amazing!
ReplyDeleteThelma @QualityStrapping.com
See also more and compare for best prices deals for Tape Dispensers here!
ReplyDelete