
I was so surprised that Mother's Day was THIS Sunday! I thought I had another week so yesterday I scrambled for a gift idea. I decided to make a brag book for my Mother-in-law and a 6 x 6" album for my mom. It would give me an excuse to try a new technique I learned from a Pin on Pinterest last week. Sarah at Sarah's Never-Ending Projects had a fabulous tutorial on her blog for printing photos on tissue paper and then modge podging the tissue paper onto canvas. I had never seen this technique before and was looking forward to an excuse to try it. Now I was in need of a heart-felt Mother's Day gift...and I had a plan.

I remembered the 2 pack of mini album's at Michael's for $4.99 that I had put in my basket on several occasions, but then promptly removed because my "want vs. need" reminder started pinching me. Wouldn't it be cool if I could Modge Podge photos printed on tissue paper to the cover of these memory books?
So I scurried down to Michael's to use my 40% off coupon and then rushed home to get started. Because I knew I wanted to make this project a tutorial I decided to experiment rather than focus on following the directions to the letter. If the albums turned out disastrous, I could always buy a plant.
The step by step instructions for this project are in red. My commentary is italicized and in black . I do this because once you get started assembling, you are going to want to find the next step quickly before your Modge Podge dries.
Printing Photos on Tissue Paper
1. Place a 8.5 x 11" sheet of printer paper on the top of a sheet of tissue paper. The crisper the tissue paper, the better but even a crinkled old piece leftover from Christmas will work. There are, however, a couple of potential problems with "used" tissue paper you should consider.
- The wrinkles will be visible on your photo when you Modge Podge the paper down. If you are hoping to use a dewy face photo of yourself when you looked like a 20 year old, wrinkled tissue paper will put a damper on your plans.
- The more worn the tissue paper, the more vulnerable it is to tearing when you are sealing it with the Modge Podge. This happened to me with a brand new sheet of tissue which was such a bummer.

3. Use a craft knife to cut the tissue paper leaving approximately one inch extra on the right and bottom edges.

4. Use a straight edge to cut precisely along the right edge so that the tissue paper width is the same as the as the printer paper. Leaving even a little extra tissue paper on the edge might cause your printer to jam.
The first time I made this cut I used the tip of my blade to cut the tissue paper. This caused the tissue paper to bunch and then tear leaving jagged edges (see the "V"-like rips in the pic above.)
The next time I used the edge of the blade, holding the knife at an angle so the blade lay flat. I sliced very lightly and went over the cut several times. Then the cut was perfect.
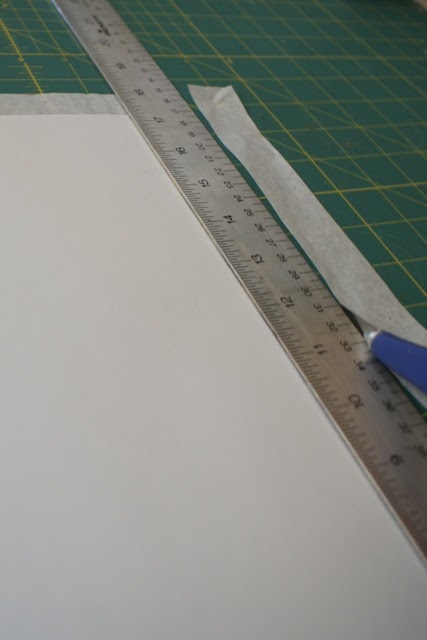
You can see the angle a little better in the photo below.

5. Once the widths are the same, place the 8.5 x 11" paper in the center of the tissue paper so there is a .5" lip on both sides. (Note: I rotated the paper in the photo below so I could use the measurement lines on the mat, but it is still the same paper and what now appears to be the width is actually the height from the photos above.)

6. Fold the .5" lips over the edges of the printer paper and tape them down using scotch tape. I taped the entire edge down to avoid a printer jam. The image below shows the tissue paper taped down.


 | |
| That gap in the photo above looked like trouble so I added a few strips of tape to keep the tissue paper from bunching in the printer. |


8. Holding the tissue paper down firmly, use a straight edge and a craft knife to cut each image out.
I sliced light enough that the printer paper underneath was not cut. This allowed me to cut out the pictures I accidentally printed on plain paper so you can see them side by side.


I was about to panic but I noticed this paper towel I had been hoarding for years. I had literally been holding on to this paper towel for 4, maybe 5 years. I had used it to clean up paint after I finished a project and thought it looked like hand made paper so I put it into my stash. I would finally put it to use by Modge Podging it onto my album cover.


I reapplied the modge podge to the album cover and...

As you can see in the photo above, the wrinkles were pretty pronounced which meant that the tissue paper photo would get really bumpy if I placed it on top. I decided to use gesso to fill in some of the cracks. I put it on pretty thick and went to the gym to give it time to dry.


- You can also use Washi tape, ribbon or lace to frame your photo. Embellish the frame with flowers, buttons, butterflies or any other bits that would compliment your photo.
I used a beautiful print Washi tape which was lovely and added several Prima flowers with button centers.


On the album below, I left the background white and used white paint to blend the edges. This cover almost looks like a painting. It is very cool.

I am so happy with both albums and with this new technique which will work with so many other kinds of projects. I hope you find this tutorial useful. Please let me know if it is confusing so I can make adjustments. Happy Mother's Day!
I have found that this site is very informative, interesting and very well written. keep up the nice high quality writing Child resistant packaging
ReplyDeleteNice blog shared with us. PrintMagic Also Avail Design Services for Photo Booklets and by adding it to the above calculator. Send us your required specifications and we’ll create the design from scratch, very unique, and by matching your needs and for brand messaging. Once you approve the design, we will get them printed and deliver them to your doorstep!
ReplyDelete