Showing posts with label Comprehensive overview. Show all posts

Thursday, August 9, 2012

Comprehensive Overview of Cricut Cartridge "Give a Hoot"

Today we are going to look at the Cricut Cartridge "Give a Hoot."   I love that Provocraft created an environmentally conscience cartridge!  Yay Provocraft!  The more mainstream green living becomes, the more people will  think about changing they way they live.  In this post we will look at:

  • a Sample view of the cartridge images
  • a look at all the borders on the cartridge
  • a Borders Reference Sheet in PDF for download
  • a look at a handbook pages with some explanation of the possibilities
  • a link to the PDF of the handbook
  • a spreadsheet with a list of the images, words and phrases with their pages numbers including a link to download the PDF version.
 A Sample view appears on the back of each cartridge box and usually shows a portion of the images that can be cut with the cartridge; but Give a Hoot shows all of the primary images in its Sample.

In addition to the primary images, this cartridge offers an accent image, a phrase, a border and a charm.  Each of these images includes at least one layer to add contrast and dimension. 

My favorite feature (other than the subject matter) is the border option. Below are all the borders that are included in this cartridge with their page numbers.

It used to take me forever to flip through the handbook to find that perfect border so I created a border reference sheet which makes the process so much easier.  You can download a PDF copy of this Give a Hoot Border Reference Sheet by clicking the link below. You should print it in horizontal orientation.  I am afraid the image quality isn't superb because I used the small image files from the cricut website. If you would like to share this information on your blog, instead of copy and pasting this info, please post a link to my site.

To use an image as a border on a 12 x 12 layout, you wouldn't want to enlarge the image to 12 inches wide .  This would make the height way to big for a page border. In order to get a long border for larger pages like 12 x 12 paper, you can either cut multiples of the border image and line them up along the edge or you can use Design Studio, Gypsy or Cricut Craft Room to weld multiple copies of the border image together.  To learn more about welding with Design Studio, click here, welding with Gypsy, click here and welding with Cricut Craft Room, click here (these are all excellent youtube video tutorials.)

Now lets take a look at a few pages from the Give a Hoot handbook so you can get a feel for what you have to work with. I have added notes to help you understand what each feature key does.

To look at the Give a Hoot handbook you can click here.

Last but not least, here is a list of all of the images and phrases on this cartridge with their page numbers.  If you find any errors in the spreadsheet, please let me know so I can correct it. If you would like to share this information on your blog, instead of copy and pasting this info, please paste a link to my site. The spreadsheet below is saved as a JPEG but you can download a PDF version of Give a Hoot here: 


Tuesday, August 7, 2012

Comprehensive Overview of Cricut Cartridge "Formal Occasion"

Today I will be doing a comprehensive Overview of the Cricut Cartridge "Formal Occasion."  It is filled with a variety of wonderfully unique images.  In this post we will look at:
  • a Sample view of the cartridge images
  • a list of themes you can use the cartridge for
  • a look at all of the frames offered on the cartridge
  • a Frames and Mats Reference Sheet in PDF for download
  • a look at a few handbook pages with some explanation of the possibilities
  • a link to the PDF of the handbook
  • a spreadsheet with a list of the images, words and phrases with their pages numbers including a link to download the PDF version.
A Sample view appears on the back of each cartridge box and usually shows a portion of the images that can be cut with the cartridge; but Formal Occasion shows all of the primary images in its Sample.  What is great is that the artwork on this cartridge is not limited to a dance, prom or "formal occasion.".  You can embellish a lot of different subjects including:
  • sewing
  • Cinderella
  • princess
  • taking photos on vacation or anytime
  • dress up/ little lady
  • girlfriends
  • shopping
  • athletics (high top shoes)
  • favorite music/ band
  • decorative flowers and paisley work on Ba-zillion different subjects as a decorative element
  • heritage / time
  • home
  • the beach / vacation
  • the city
  • cowboy
  • camping/ mountain vacation/ hiking/ nature
  • night/ evening
  • movies/ play
  • love/ romance
and that is just what I came up with in 5 minutes.

In addition to the primary images, you also get frames and mats for your photos and layered phrases like "Prom," "New Year's Eve" and "Dance Until Dawn".  Almost all of the phrases include a mat or frame that matches the photo frame.  Below are all the photo frames/ mats that are included on this cartridge with their page numbers.


All of the frames and mats are layered.  You can use just one of the layers or stack them all to add additional dimension and color.  I turn to Formal Occasion for almost all of my framing needs.  It used to take me forever to flip through the handbook to find that perfect frame to mount a photo or use in a card but I created a frame  reference sheet which makes the process so much easier.  You can download a PDF copy of this Formal Occasion Frames and Mats Reference Sheet by clicking the link below.  If you would like to share this information on your blog, instead of copy and pasting this info, please paste a link to my site.:


Lets take a look at a few pages out of the handbook so you can see how they are laid out:

The Frame options below include 3 mats and one frame which is the wonky oval on the Frame Layer.  If you wanted to cut a more substantial frame, you could pair the mats from this page with a frame from another.  You could also use this little frame on its own to emphasize a word in a title or around the focal point of your photo.
For the example above the word in the phrase can be used alone or with 1 or more of the mats.  The phrase below is not legible unless you cut both the Phrase and the Phrase layer.  Both Layers + shift are not necessary for the phrase to properly reveal the word Homecoming.
The dress image above offers 3 different mat sets.  There is a mat set for the dress, a mat set for the phrase, and a additional mat set (under the Frame options) for your photo although you could use it as a mat on a card or as a decorative element elsewhere.

To get a better look at the handbook, click here to view the handbook in PDF format.

Last but not least, here is a list of all of the images and phrases on this cartridge with their page numbers.  If you find any errors in the spreadsheet, please let me know so I can correct it. If you would like to share this information on your blog, instead of copy and pasting this info, please paste a link to my site. The spreadsheet below is saved as a JPEG but you can download a PDF version of Formal Occasion here:


Sunday, August 5, 2012

Overview of the Cricut Cartridge "My Community"

Today I will be talking about at the Cricut cartridge "My Community" and I will offer a project challenge.  If you have never looked at this cartridge you are in for a treat!  In my opinion, this is one of the most versatile and applicable cartridges Cricut offers.  I can't wait to show you what you get to play with.  In this post you will get:
  • a sample view of the cartridge images
  • a list of the various themes this cartridge can work with
  • a project challenge
  • a look at a few handbook pages with some explanation of the possibilities
  • a link to the PDF of the handbook
  • photos of image layers assembled
  • a spreadsheet with a list of the images, words and phrases, cards and projects with their pages numbers including a link to download the PDF version.

This is the sample sheet Provocraft prints on the back of the box.  Usually their cartridge sample sheets do not show all of the images on the cartridge but on "My Community" they do.  There are 98 layered images with a shadow and a blackout plus a puzzle piece, a tile and a notebook page.  I love the range of topics. You could use this cartridge for so many different themes:
  • school
  • heritage
  • baby
  • Christmas
  • Games
  • projects with kids
  • nursery rhymes
  • family
  • animals / farm
  • home
  • travel /road trip
  • Easter
  • Thanksgiving
  • people
  • nature
  • community
  • railroad and trains
  • vehicles
  • mail
  • firemen
  • policemen
  • shopping
  • ice cream/ candy
  • going out to eat
  • library
PROJECT CHALLENGE - I was returning library books the other day and as I drove past our local park, I saw our mail carrier eating her lunch in the shade and thought; "I need a scrapbook of our neighborhood!"  It would be so fabulous to show my grandchildren where their parents grew up and perhaps, how we lived "in the olden days."   So over the next few days I am going to head out on foot to take photos of the people and places that are a part of our lives. Then I am going to scrapbook these photos using the "My Community" cartridge.  I invite you to join me, and, if you'd like, post a link to photos of your project.  Doesn't that sound like fun! You could do this in your Smash Book, as a mini album, as one or several layouts or in your journal.  I'd love to see what you come up with!

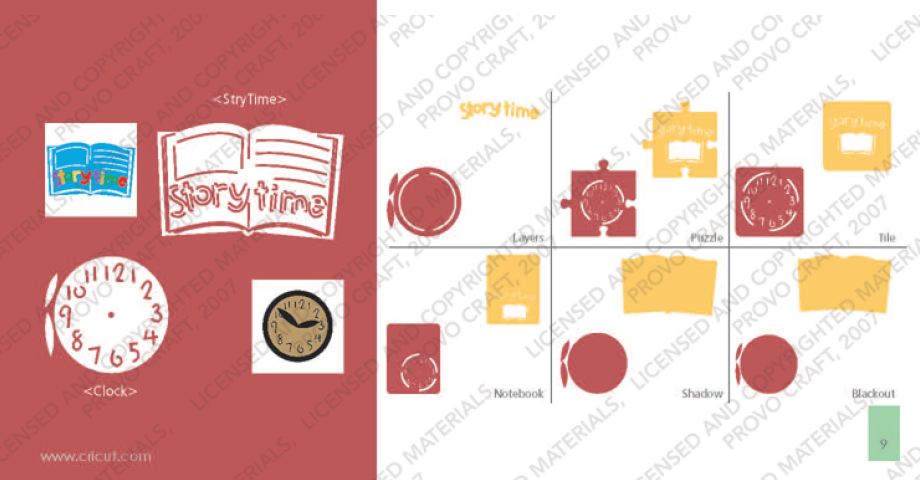
On the page above, which has a matching key on the cartridge overlay, your two primary images are of a police station facade and a policeman (key with shift).  Add the "Layers" feature key and Cricut cuts 2 light posts and a piece of building trim as another layer for the police station. With shift, Cricut cuts the policeman uniform.  Add the "Shadow" or "Blackout" feature key to cut layers to be placed under the primary image.  The "Puzzle," the "Tile" and the "Notebook" feature keys produce the primary image within a puzzle piece, a tile and a notebook page.

To see and download the entire handbook, click here.

Sometimes cutting and layering an image isn't as easy as it looks.  Since I want to offer a truly comprehensive overview of the cartridges, I thought I would cut the two main images from page 9 to see how all the layers work together.
The clock above was assembled with the primary image and the Layer. The clock hands come from the Layer - they seem to be a little large for the clock but could be trimmed and attached with a brad.
The clock face below is made with the primary image, the Layer and the Shadow.  For the hands, I used the primary and the Layer image hands stacked. 

The image below is made with the primary image with the shift key (the white), the Layer with shift (the letters that spell story time), the Shadow (light brown) and the Blackout (dark brown).

 
In order to get the multi-color spelling, I had to cut the Layer 5 times, 1 in each color.


There is not a way to isolate the letters so that you can get multiple colors with one cut unless you use the hide contour feature on Design Studio, Gypsy or Cricut Craft Room.

To do this, you would press "Layer" 5 times and then use the hide contour feature to hide all but 2 of the letters on each of the 5 copies.  Then you would place scraps of paper for each colors on your sticky mat to match the location on your virtual mat.  By doing this, you are not left with a pile of extra letters like shown above.

I cut the story book image at 2.5 inches.  Because the die cut is rather small, the light brown shadow under the primary image does not show through very well to create contrast that appears like lines of text.  With inking or Copic markers you can create this look manually.

Last but not least, here is a list of all of the images and phrases on this cartridge with their page numbers.  If you find any errors in the spreadsheet, please let me know so I can correct it. If you would like to share this information on your blog, instead of copy and pasting this info, please paste a link to my site. The spreadsheet below is saved as a JPEG but you can download a PDF version of My Community here: